UICollectionView custom layout tutorial

For a recent project I needed to refactor a primary view within our iPad app, so I decided to learn the ins and outs of UICollectionView (introduced in iOS 6) and I thought it would make for a good tutorial to share. My project ended up needing a custom UICollectionViewLayout which meant I needed to handle more of the layout logic than if I'd used the UICollectionViewFlowLayout that Apple provides. However, creating a custom layout allows far more design flexibility, so thats what I'll be taking you through here.
We'll go through the process step-by-step, covering the major concepts of custom layout design:
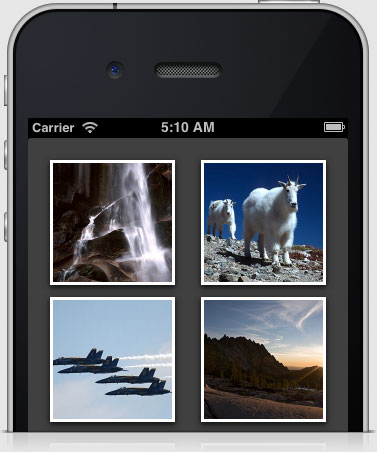
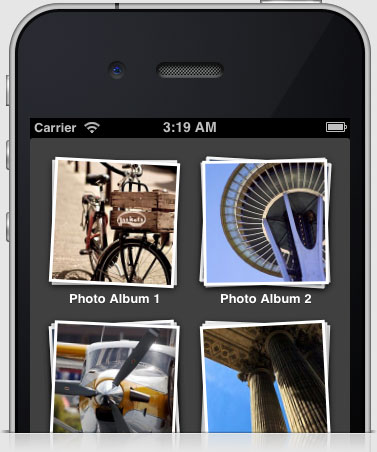
At the end we'll have a fully functioning photo stack layout as seen here. Even if you're interested in implementing a layout which is considerably different than the one presented here, the fundamental concepts will be quite similar. So kick back with your favorite beverage and in an evening or two you'll have a full understanding of custom layouts.
The final project is available on github.
Getting Started
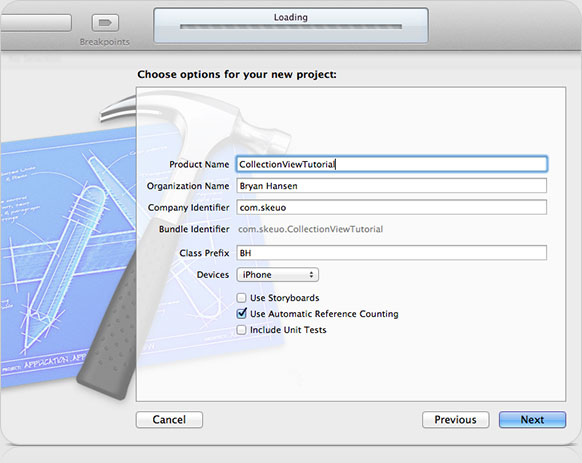
- In Xcode, create a new Single View Application
- Change the view controller header so that it subclasses UICollectionViewController instead:
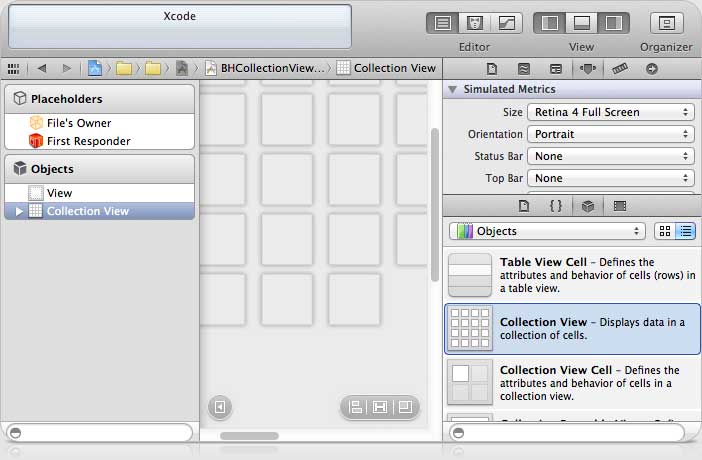
- Select the view controller's xib, then open the right side inspector pane if it isn't open yet.
- Find a Collection View object from the bottom of the right pane and drag a new one into the left sub pane under the view which already exists.
- Select the old View in the left sub pane and delete it.
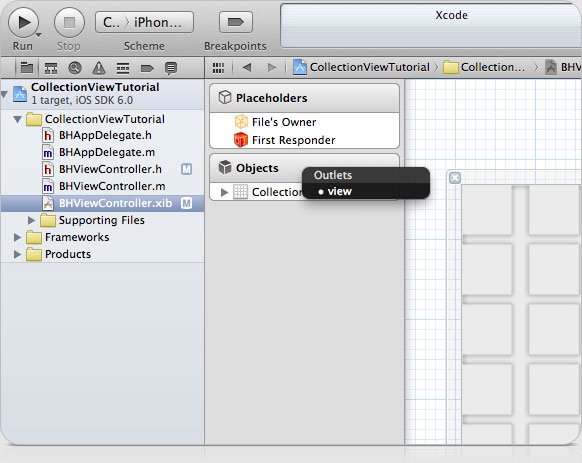
- Now Control-drag from the File's Owner to the Collection View. When you release, select view from the list to designate the collection view as the view controller's primary view.
- Create a new Xcode group named View Controller and drag the view controller and associated xib into this group.
- Within the View Controller group, create a new Objective-C class called BHPhotoAlbumLayout which subclasses UICollectionViewLayout
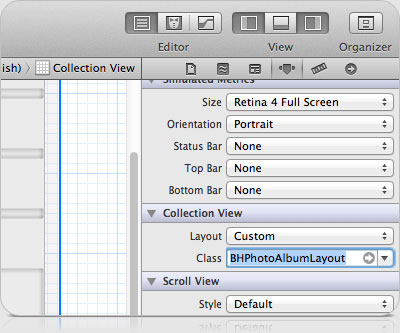
- Select the view controller's xib again, then select the Collection View instance in the left sub pane.
- In the right inspector pane, select the Attributes tab and then scroll down to the Collection View section.
- In this section, change the layout from Flow to Custom, then enter BHPhotoAlbumLayout in the revealed class field.
- In our view controller subclass import the BHPhotoAlbumLayout header then add a private property as an IBOutlet:
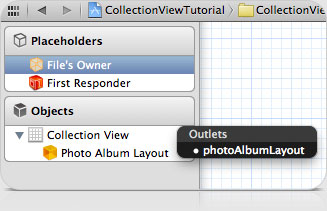
- Switch back to the xib file. Under Objects, expand the Collection View then control-drag from File's Owner to Photo Album Layout.
- In our view controller within viewDidLoad set the background color of the view:
- Create a new Xcode group named View.
- Within this group, create an Objective-C class named BHAlbumPhotoCell which subclasses UICollectionViewCell. For now let's keep things simple and only set a background color on this cell within initWithFrame:
- Add the following properties to BHPhotoAlbumLayout header:
- Add these methods to the BHPhotoAlbumLayout implementation:
- Define a static NSString for the BHAlbumPhotoCell at the top of the BHPhotoAlbumLayout implementation.
- Below this, add the top-level dictionary as a private property.
- Override prepareLayout in the BHPhotoAlbumLayout implementation:
- Add frameForAlbumPhotoAtIndexPath: to the BHPhotoAlbumLayout implementation:
- Override layoutAttributesForElementsInRect: in BHPhotoAlbumLayout as follows:
- Override layoutAttributesForItemAtIndexPath: in BHPhotoAlbumLayout as follows:
- Override collectionViewContentSize: in BHPhotoAlbumLayout as follows:
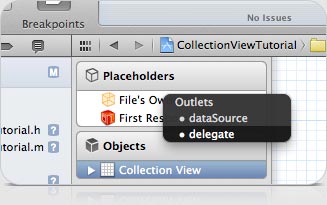
- Open the xib associated with our view controller and control-drag from the Collection View to File's Owner. Click the dataSource outlet and then repeat again to set the delegate outlet.
- In our view controller's header declare that it implements the protocol for UICollectionViewDataSource and UICollectionViewDelegate.
- Switch to our view controller implementation and import BHAlbumPhotoCell.h and define a string for the cell identifier:
- Now at the end of viewDidLoad on our view controller, register the cell class for the identifier we defined:
- Implement numberOfSectionsInCollectionView: on our view controller:
- Next, implement numberOfItemsInSection: on our view controller:
- Then, implement collectionView:cellForItemAtIndexPath: on our view controller:
- Override willRotateToInterfaceOrientation:duration: on our view controller:
- Implement setters for each of the custom properties on BHPhotoAlbumLayout:
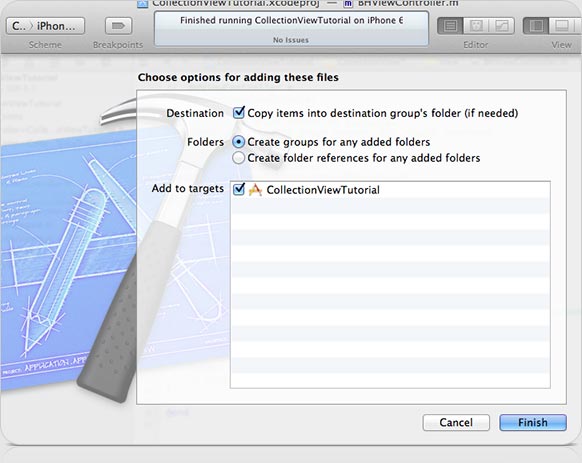
- Create a group named Model, then drag files for BHPhoto and BHAlbum into the group. Ensure that the box is checked for your app in Add to targets and if you're dragging the files from a location outside of your project files, make sure Copy item's into destination group's folder is also checked.
- At the top of our view controller implementation, import BHAlbum.h and BHPhoto.h.
- Next, create a private mutable array property to hold all of the albums :
- Then, within the viewDidLoad method on our view controller add the following after setting the background color on the collection view:
- We also need to update the collection view dataSource methods on our view controller so that the correct section and item counts are returned:
- Add a UIImageView property as readonly to the BHAlbumPhotoCell header then redefine it as readwrite in the implementation:
- Add the import at the top of the BHAlbumPhotoCell implementation:
- Then update initWithFrame: on BHAlbumPhotoCell to the match the following:
- Add prepareForReuse to BHAlbumPhotoCell:
- On our view controller update collectionView:cellForItemAtIndexPath: to match the following:
- First we need to add a private property for the operation queue at the top of our view controller.
- Add these lines to the bottom of viewDidLoad on our view controller.
- Replace the old implementation of collectionView:cellForItemAtIndexPath: on our view controller with the following:
- Declare these constants below where you import your headers at the top of the BHPhotoAlbumLayout implementation:
- Then create a private array property in the BHPhotoAlbumLayout implementation as well:
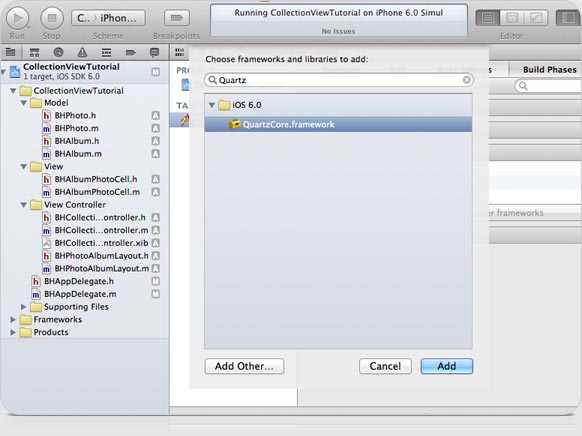
- Select your project file, then select the Build Phases tab at the top of the middle column. Expand the Link Binary With Libraries section and hit the + button at the bottom left. Find the QuartzCore.framework and add it to your project:
- Next, add the following at end of the setup method on BHPhotoAlbumLayout:
- Add the following method towards the bottom of the BHPhotoAlbumLayout implementation:
- Now in prepareLayout, directly below where we set the frame on our UICollectionViewLayoutAttributes let's set the transform3D using our transformForAlbumPhotoAtIndex: method:
- Update the initWithFrame: method on BHAlbumPhotoCell by adding 2 new lines:
- In viewDidLoad on our view controller, update the beginning of the inner for-loop to increase the number of photos in each section:
- In collectionView:cellForItemAtIndexPath: on our view controller set the priority of the NSBlockOpertation before adding it to the queue:
- Add an integer constant at the top of the BHPhotoAlbumLayout implementation:
- Then in prepareLayout on BHPhotoAlbumLayout set the zIndex on the layer attributes:
- In the BHPhotoAlbumLayout header add a property for titleHeight:
- Add the following below the other setter methods on BHPhotoAlbumLayout:
- Let's also set a sensible default for this property within the setup method:
- Define an NSString at the top of the BHPhotoAlbumLayout header then set it in the implementation:
- At the beginning of prepareLayout on BHPhotoAlbumLayout create another dictionary:
- Update the inner-loop on prepareLayout to match the following:
- Add the following towards the end of prepareLayout, right after setting the cellLayoutInfo on newLayoutInfo:
- After the other existing frame helper method add frameForAlbumTitleAtIndexPath:
- Update frameForAlbumPhotoAtIndexPath: to take account of the title height when calculating originY:
- Also, update the height calculation on collectionViewContentSize: to take account of the title height:
- Add the following method on BHPhotoAlbumLayout below where we do this for our cells already:
- Create a class within the View grouping called BHAlbumTitleReusableView which subclasses UICollectionReusableView.
- Create a readonly property called titleLabel to the header of BHAlbumTitleReusableView and then re-define it as readwrite in its implementation:
- Update initWithFrame: on BHAlbumTitleReusableView to the following:
- Override perpareForReuse on BHAlbumTitleReusableView:
- At the top of our view controller implementation define a static NSString for the identifier:
- Next, import the BHAlbumTitleReusableView header at the top of our view controller implementation.
- Then add the following towards the end of viewDidLoad:
- Add collectionView:viewForSupplementaryElementOfKind:atIndexPath: to our view controller:
- Create a new group named Images within the existing Supporting Files group.
- Download a texture you like and then add the image files to the Images group.
- In viewDidLoad on our view controller subclass update the background color we set on the collection view to use a pattern:
- Create a class named BHEmblemView as a subclass of UICollectionReusableView within the View group.
- Add these image files to the Images group of your project:
- Add a class method named defaultSize to the BHEmblemView header:
- Switch to the implementation of BHEmblemView and add a constant for the image name:
- Then implement defaultSize:
- Update initWithFrame: on BHEmblemView to match the following:
- Import the BHEmblemView header into the BHPhotoAlbumLayout implementation.
- Define another kind string for our emblem at the top of the BHPhotoAlbumLayout:
- Register the emblem view at the end of the setup method on BHPhotoAlbumLayout:
- Add frameForEmblem towards the bottom of BHPhotoAlbumLayout:
- Update prepareLayout to match the following:
- Add layoutAttributesForDecorationViewOfKind:atIndexPath: to BHPhotoAlbumLayout:
This tutorial is focused on the iPhone, but if you want to create a project for the iPad, most of what's presented should work with minimal changes. Once your project is created you'll have a bare-bones iOS app with a stock UIViewController.
In this design, all of the content for our view controller will fit within the collection view automatically provided. If your design has other elements such as static header or footer sections, then you'd want to use a UIViewController with a UICollectionView as one of it's subviews.
#import <UIKit/UIKit.h>

@interface BHCollectionViewController : UICollectionViewController

@end
You may want to rename the view controller to something more appropriate. This can be done easily by selecting the class name in code and choosing Edit > Refactor > Rename. You should also update the xib referenced when calling initWithNibName: in your app delegate to reflect the name change.
We also need to change the xib associated with this view controller so that it references a UICollectionView rather than the stock UIView it has now.
Now we have a Collection View instance, but our old view is still associated with the controller. Let's fix that.
Now is a great time to organize our Xcode files a bit, before we keep adding more class files.
Since we'll be creating our own completely custom layout, we need to create a Collection View layout subclass which will handle the layout logic of all of its subviews.
Next, we'll make a couple changes to the view controller's xib to support our custom layout class.
Eventually we'll need to access the instance of this layout from our view controller so we should create a property outlet in code and hook it up in the xib.
#import "BHCollectionViewController.h"
#import "BHPhotoAlbumLayout.h"

@interface BHCollectionViewController ()

@property (nonatomic, weak) IBOutlet BHPhotoAlbumLayout *photoAlbumLayout;

@end

@implementation BHCollectionViewController
...
At this point if you were to run the app, even if you've done everything correct, you'd still be staring at a black abyss… not too reassuring. Setting a background color on the collection view is a good way to check that the view is set up correctly.
...
@implementation BHCollectionViewController

- (void)viewDidLoad
{
    [super viewDidLoad];

    self.collectionView.backgroundColor = [UIColor colorWithWhite:0.25f alpha:1.0f];
}
...
Now you can fire up your app and ensure that the collection view is showing up as it should. You should see the dark gray background color we defined, rather than the default black.
Next we'll start working on the specific views that our collection view will be presenting. UICollectionView and UITableView are actually quite similar in some respects. They both use a delegation design pattern to facilitate browsing and interacting with a collection of views (cells), as well as ensuring performance is acceptable by providing a means to cache and reuse these views. However, whereas UITableView enforces some specifics of its visual design and layout, UICollectionViews do not impose any kind of visual design or layout, allowing much more customization with regard to the presentation of it's content. We'll customize our presentation logic soon enough, but first we'll create some reusable views for our collection view. This is very similar to creating custom cells for a UITableView.
#import "BHAlbumPhotoCell.h"

@implementation BHAlbumPhotoCell

- (id)initWithFrame:(CGRect)frame
{
    self = [super initWithFrame:frame];
    if (self) {
        self.backgroundColor = [UIColor colorWithWhite:0.85f alpha:1.0f];
    }
    return self;
}

@end
Calculating Layouts
Now that we have a simple cell ready for use, we're going to get some basics of the layout logic implemented. We'll start by declaring some properties that will allow customization of various aspects of the layout.
@interface BHPhotoAlbumLayout : UICollectionViewLayout

@property (nonatomic) UIEdgeInsets itemInsets;
@property (nonatomic) CGSize itemSize;
@property (nonatomic) CGFloat interItemSpacingY;
@property (nonatomic) NSInteger numberOfColumns;

@end
Let's set some defaults for these values to make it easier on any consumers of our layout. Since someone could specify the layout of their collection view in a xib file (as we did) or initialize it directly in code, we need to override both the init and initWithCoder: methods. Also, instead of duplicating code, let's create a method named setup which will get called by either of these.
#pragma mark - Lifecycle

- (id)init
{
    self = [super init];
    if (self) {
        [self setup];
    }

    return self;
}

- (id)initWithCoder:(NSCoder *)aDecoder
{
    self = [super init];
    if (self) {
        [self setup];
    }

    return self;
}

- (void)setup
{
    self.itemInsets = UIEdgeInsetsMake(22.0f, 22.0f, 13.0f, 22.0f);
    self.itemSize = CGSizeMake(125.0f, 125.0f);
    self.interItemSpacingY = 12.0f;
    self.numberOfColumns = 2;
}
Now we're getting to the meat and potatoes of our layout logic. We need to override a handful of methods which will compute and return layout information to the collection view. Although there is more than one way to do this, Apple's recommended approach for layouts which change infrequently and hold hundreds of items (rather than thousands) is to calculate and cache all of the layout information upfront and then access that cache when the collection view requests it. If you'd like to learn more, check out Apple's documentation on Creating Custom Layouts.
We'll use a dictionary to store all of our layout information. The structure will be as follows:

We'll create a sub-dictionary for each type of view and use the index path of each specific view as the key and its layout attributes as the associated value. Then in the top-level dictionary we'll use the specific kind of view as our key and the sub-dictionary we just created as the value. This allows quick access to the layout attributes of a specific kind of view at a specific index path. Let's add the key we'll use for our cells now.
#import "BHPhotoAlbumLayout.h"

static NSString * const BHPhotoAlbumLayoutPhotoCellKind = @"PhotoCell";

@implementation BHPhotoAlbumLayout
...
#import "BHPhotoAlbumLayout.h"

static NSString * const BHPhotoAlbumLayoutPhotoCellKind = @"PhotoCell";

@interface BHPhotoAlbumLayout ()

@property (nonatomic, strong) NSDictionary *layoutInfo;

@end

@implementation BHPhotoAlbumLayout
...
We now have everything we need to implement prepareLayout. Let's do this!
#pragma mark - Layout

- (void)prepareLayout
{
    NSMutableDictionary *newLayoutInfo = [NSMutableDictionary dictionary];
    NSMutableDictionary *cellLayoutInfo = [NSMutableDictionary dictionary];

    NSInteger sectionCount = [self.collectionView numberOfSections];
    NSIndexPath *indexPath = [NSIndexPath indexPathForItem:0 inSection:0];

    for (NSInteger section = 0; section < sectionCount; section++) {
        NSInteger itemCount = [self.collectionView numberOfItemsInSection:section];

        for (NSInteger item = 0; item < itemCount; item++) {
            indexPath = [NSIndexPath indexPathForItem:item inSection:section];

            UICollectionViewLayoutAttributes *itemAttributes =
                [UICollectionViewLayoutAttributes layoutAttributesForCellWithIndexPath:indexPath];
            itemAttributes.frame = [self frameForAlbumPhotoAtIndexPath:indexPath];

            cellLayoutInfo[indexPath] = itemAttributes;
        }
    }

    newLayoutInfo[BHPhotoAlbumLayoutPhotoCellKind] = cellLayoutInfo;

    self.layoutInfo = newLayoutInfo;
}
The logic here is actually pretty straight-forward. First, we create some mutable dictionaries. Then for each section in the collection view we loop through each of it's items and create UICollectionViewLayoutAttributes based on the current index path. We set the frame for this view's attributes and then add these attributes to the sub-dictionary. Once we've looped through all of our sections, we set the sub-dictionary on the top-level dictionary. At the very end, we set our private dictionary property to the temporary dictionary we created here. You may have noticed that we call frameForAlbumPhotoAtIndexPath: which we haven't written yet. I guess we should go do that.
#pragma mark - Private

- (CGRect)frameForAlbumPhotoAtIndexPath:(NSIndexPath *)indexPath
{
    NSInteger row = indexPath.section / self.numberOfColumns;
    NSInteger column = indexPath.section % self.numberOfColumns;

    CGFloat spacingX = self.collectionView.bounds.size.width -
                       self.itemInsets.left -
                       self.itemInsets.right -
                       (self.numberOfColumns * self.itemSize.width);

    if (self.numberOfColumns > 1) spacingX = spacingX / (self.numberOfColumns - 1);

    CGFloat originX = floorf(self.itemInsets.left + (self.itemSize.width + spacingX) * column);

    CGFloat originY = floor(self.itemInsets.top +
                      (self.itemSize.height + self.interItemSpacingY) * row);

    return CGRectMake(originX, originY, self.itemSize.width, self.itemSize.height);
}
The frame is computed based on the index path passed in. First we determine the correct row and column for the item. Then we determine the combined total amount of horizontal spacing between items. Then, if we have more than 1 column, we divide up the total spacing to arrive at the spacing for each item. Now we can calculate the horizontal offset of our frame. Notice that we floor this value so that our frame lands on whole pixels, ensuring it looks sharp. One subtle detail here is that we should floor the value at this point, not in the line before where we divided by the number of columns. This ensures that items are spaced correctly as we go across since we round the value after multiplying by the column. Next we calculate our vertical offset and then return the frame based on the origins and item size.
Now that our layout has been determined, we need to override the methods which will pass this back to the collection view when its needed. The first one we'll override is layoutAttributesForElementsInRect. This method needs to return all the layout attributes needed for a given content area of the collection view. Since all we're dealing with so far are cells, we simply need to figure out which cells lie within the rect passed in. This is nice and easy now that we have all of our layout attributes at the ready in our layoutInfo dictionary.
- (NSArray *)layoutAttributesForElementsInRect:(CGRect)rect
{
    NSMutableArray *allAttributes = [NSMutableArray arrayWithCapacity:self.layoutInfo.count];

    [self.layoutInfo enumerateKeysAndObjectsUsingBlock:^(NSString *elementIdentifier,
                                                        NSDictionary *elementsInfo,
                                                        BOOL *stop) {
        [elementsInfo enumerateKeysAndObjectsUsingBlock:^(NSIndexPath *indexPath,
                                                         UICollectionViewLayoutAttributes *attributes,
                                                         BOOL *innerStop) {
            if (CGRectIntersectsRect(rect, attributes.frame)) {
                [allAttributes addObject:attributes];
            }
        }];
    }];

    return allAttributes;
}
We start off by creating a mutable array where we can store all the attributes that need to be returned. Next we're going to take advantage of the nice block-based dictionary enumeration to cruise through our layoutInfo dictionary. The outer block iterates through each of the sub-dictionaries we've added (only the cells at the moment), then we iterate through each cell in the sub-dictionary. CGRectIntersectsRect makes it simple to check if the cell we're looking at intersects with the rect that was passed in. If it does, we add it to the array we'll be passing back.
The next method we need to implement is even easier because of the caching mechanism we've adopted.
- (UICollectionViewLayoutAttributes *)layoutAttributesForItemAtIndexPath:(NSIndexPath *)indexPath
{
    return self.layoutInfo[BHPhotoAlbumLayoutPhotoCellKind][indexPath];
}
All we're doing here is looking up the sub-dictionary for cells and then returning the layout attributes for a cell at the passed in index path. It couldn't be simpler!
The last method we need to override to get our layout up and running needs to return the overall content size for all our content.
- (CGSize)collectionViewContentSize
{
    NSInteger rowCount = [self.collectionView numberOfSections] / self.numberOfColumns;
    // make sure we count another row if one is only partially filled
    if ([self.collectionView numberOfSections] % self.numberOfColumns) rowCount++;

    CGFloat height = self.itemInsets.top +
                     rowCount * self.itemSize.height + (rowCount - 1) * self.interItemSpacingY +
                     self.itemInsets.bottom;

    return CGSizeMake(self.collectionView.bounds.size.width, height);
}
This calculates and returns the total size needed to show everything in our collection view. The height is based on the total number of rows and the width is simply the width of the collection view itself.
UICollectionViewDataSource Methods
With the basics of our layout complete, we now need to return some valid content from the data source methods in our view controller subclass. Before returning any cells to our collection view, we first need to designate our view controller as the data source and delegate for our collection view.
@interface BHCollectionViewController : UICollectionViewController <UICollectionViewDataSource,
                                        UICollectionViewDelegate>
Now we're going to register our cell class with the collection view. This tells the collection view what it should be asking for. This necessitates having an identifier for the cell.
#import "BHCollectionViewController.h"
#import "BHPhotoAlbumLayout.h"
#import "BHAlbumPhotoCell.h"

static NSString * const PhotoCellIdentifier = @"PhotoCell";

@interface BHCollectionViewController ()
...
- (void)viewDidLoad
{
    [super viewDidLoad];

    self.collectionView.backgroundColor = [UIColor colorWithWhite:0.25f alpha:1.0f];

    [self.collectionView registerClass:[BHAlbumPhotoCell class]
            forCellWithReuseIdentifier:PhotoCellIdentifier];
}
Next we need to implement three data source methods which will look familiar to those who have worked with UITableView before.
#pragma mark - UICollectionViewDataSource

- (NSInteger)numberOfSectionsInCollectionView:(UICollectionView *)collectionView
{
    return 10;
}
For now simply return a static number, we'll get real content working soon enough.
- (NSInteger)collectionView:(UICollectionView *)collectionView
     numberOfItemsInSection:(NSInteger)section
{
    return 5;
}
- (UICollectionViewCell *)collectionView:(UICollectionView *)collectionView
                  cellForItemAtIndexPath:(NSIndexPath *)indexPath
{
    BHAlbumPhotoCell *photoCell =
        [collectionView dequeueReusableCellWithReuseIdentifier:PhotoCellIdentifier
                  forIndexPath:indexPath];

    return photoCell;
}
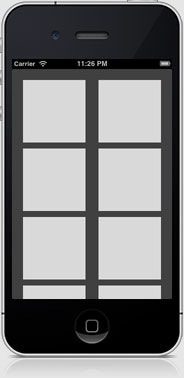
Alright, its finally time to fire up the Simulator and see if our layout is working. If you've done things right, you should see a group of gray squares in 2 columns which you can scroll through vertically. Now we're getting somewhere!
Alright things are looking great so far, but have you tried rotating your device to landscape? Hmm… not quite what we're looking for. Instead of showing 2 columns and a bunch of unused space on the right, it'd be better to show 3 columns when in landscape. Let's make that happen!
#pragma mark - View Rotation

 - (void)willRotateToInterfaceOrientation:(UIInterfaceOrientation)toInterfaceOrientation
                                 duration:(NSTimeInterval)duration
 {
     if (UIInterfaceOrientationIsLandscape(toInterfaceOrientation)) {
         self.photoAlbumLayout.numberOfColumns = 3;

         // handle insets for iPhone 4 or 5
         CGFloat sideInset = [UIScreen mainScreen].preferredMode.size.width == 1136.0f ?
                             45.0f : 25.0f;

         self.photoAlbumLayout.itemInsets = UIEdgeInsetsMake(22.0f, sideInset, 13.0f, sideInset);

     } else {
         self.photoAlbumLayout.numberOfColumns = 2;
         self.photoAlbumLayout.itemInsets = UIEdgeInsetsMake(22.0f, 22.0f, 13.0f, 22.0f);
     }
 }
First we check if the device is in Landscape, and if so, we set the number of columns to 3 and then adjust the itemInsets a bit to make things evenly spaced. If we're in Portrait then we set the columns to 2 and use the same values we had set by default in our layout.
Let's give this a whirl, fire up your app…
What gives? Why didn't we get the layout we specified? Moreover, if you try scrolling, things act strangely. The issue is that our layout attributes haven't been updated to reflect the new state of our view. This highlights one of the tasks we must do whenever changes are made that impact the layout of the items in our collection view. We need to invalidate the layout, which will cause all of our layout attributes to be recalculated. This is done by calling invalidateLayout on the UICollectionViewLayout instance and it needs to happen whenever any of the custom properties we added to our layout change. To do this correctly we should explicitly implement the setters for these properties and invalidate the layout there as well.
#pragma mark - Properties

- (void)setItemInsets:(UIEdgeInsets)itemInsets
{
    if (UIEdgeInsetsEqualToEdgeInsets(_itemInsets, itemInsets)) return;

    _itemInsets = itemInsets;

    [self invalidateLayout];
}

- (void)setItemSize:(CGSize)itemSize
{
    if (CGSizeEqualToSize(_itemSize, itemSize)) return;

    _itemSize = itemSize;

    [self invalidateLayout];
}

- (void)setInterItemSpacingY:(CGFloat)interItemSpacingY
{
    if (_interItemSpacingY == interItemSpacingY) return;

    _interItemSpacingY = interItemSpacingY;

    [self invalidateLayout];
}

- (void)setNumberOfColumns:(NSInteger)numberOfColumns
{
    if (_numberOfColumns == numberOfColumns) return;

    _numberOfColumns = numberOfColumns;

    [self invalidateLayout];
}
Each setter first checks if the value being set is identical to what it is already set and returns if thats the case. If its different, it sets the instance variable and then invalidates the layout.
Run your app now, it should behave as expected when you rotate the device.
Adding Content
With our layout coming along nicely, let's put in a little effort towards getting some real content to display. These gray squares are nice and all, but what we really want to see are some fancy photos!
To facilitate providing photos to our collection view we're going to need some classes to represent them. These are considered part of the Model, within the Model-View-Controller conceptual organization of our app. Since the focus of this tutorial is on Collection Views I'm not going to spend much time on the model classes. Normally you would use something like CoreData or another persistent storage solution to handle this aspect of your app. For this tutorial simply download the model classes and then add them to your project.
These classes are pretty straightforward. BHPhoto has a thumbnail URL and image for a photo. BHAlbum has a name and an array of photos, and the ability to add or remove a photo.
Now we can create some albums and add a photo to each so that we have something a bit more interesting to display.
#import "BHCollectionViewController.h"
#import "BHPhotoAlbumLayout.h"
#import "BHAlbumPhotoCell.h"
#import "BHAlbum.h"
#import "BHPhoto.h"

@interface BHCollectionViewController ()
...
@interface BHCollectionViewController ()

@property (nonatomic, strong) NSMutableArray *albums;
@property (nonatomic, weak) IBOutlet BHPhotoAlbumLayout *photoAlbumLayout;

@end

@implementation BHCollectionViewController
...
self.albums = [NSMutableArray array];

NSURL *urlPrefix =
    [NSURL URLWithString:@"https://raw.github.com/ShadoFlameX/PhotoCollectionView/master/Photos/"];

NSInteger photoIndex = 0;

for (NSInteger a = 0; a < 12; a++) {
    BHAlbum *album = [[BHAlbum alloc] init];
    album.name = [NSString stringWithFormat:@"Photo Album %d",a + 1];

    NSUInteger photoCount = 1;
    for (NSInteger p = 0; p < photoCount; p++) {
        // there are up to 25 photos available to load from the code repository
        NSString *photoFilename = [NSString stringWithFormat:@"thumbnail%d.jpg",photoIndex % 25];
        NSURL *photoURL = [urlPrefix URLByAppendingPathComponent:photoFilename];
        BHPhoto *photo = [BHPhoto photoWithImageURL:photoURL];
        [album addPhoto:photo];

        photoIndex++;
    }

    [self.albums addObject:album];
}
These photos are loaded from the GitHub repository for this project and are some of my favorite photos that I've taken over the past few years.
- (NSInteger)numberOfSectionsInCollectionView:(UICollectionView *)collectionView
{
    return self.albums.count;
}

- (NSInteger)collectionView:(UICollectionView *)collectionView
     numberOfItemsInSection:(NSInteger)section
{
    BHAlbum *album = self.albums[section];

    return album.photos.count;
}
Alright, we've got a few photo albums with a couple photos each ready for us to use. Now we need to update our photo cell so that it can display them.
#import <UIKit/UIKit.h>

@interface BHAlbumPhotoCell : UICollectionViewCell

@property (nonatomic, strong, readonly) UIImageView *imageView;

@end
#import "BHAlbumPhotoCell.h"

@interface BHAlbumPhotoCell ()

@property (nonatomic, strong, readwrite) UIImageView *imageView;

@end

@implementation BHAlbumPhotoCell
...
This follows the convention that Apple uses for subviews on UITableViewCell, allowing consumers of this class to change properties of the provided image view, but not switch out the image view itself.
Next we'll set up the image view and some other aesthetics on our cell. In order to pull of some of the desired look, we're going to change some properties on our cell's backing layer. To do this we need to import the QuartzCore framework.
#import "BHAlbumPhotoCell.h"
#import <QuartzCore/QuartzCore.h>

@interface BHAlbumPhotoCell ()
...
- (id)initWithFrame:(CGRect)frame
{
    self = [super initWithFrame:frame];
    if (self) {
        self.backgroundColor = [UIColor colorWithWhite:0.85f alpha:1.0f];

        self.layer.borderColor = [UIColor whiteColor].CGColor;
        self.layer.borderWidth = 3.0f;
        self.layer.shadowColor = [UIColor blackColor].CGColor;
        self.layer.shadowRadius = 3.0f;
        self.layer.shadowOffset = CGSizeMake(0.0f, 2.0f);
        self.layer.shadowOpacity = 0.5f;

        self.imageView = [[UIImageView alloc] initWithFrame:self.bounds];
        self.imageView.contentMode = UIViewContentModeScaleAspectFill;
        self.imageView.clipsToBounds = YES;

        [self.contentView addSubview:self.imageView];
    }

    return self;
}
Here we're setting a few different properties on our cell's layer to give a nice drop shadow and border affect. We also instantiate our image view, set some properties for its display, and then add it as a subview of the cell's contentView.
The last bit of work we need to do on our cell is override prepareForReuse and reset any image that may have been set on the imageView. This ensures that our cells look fresh even when they are reused by the collectionView.
- (void)prepareForReuse
{
    [super prepareForReuse];

    self.imageView.image = nil;
}
We need to call super when overriding this method so that the cell is properly setup before being reused.
Sweet, now we can set an image on our photo cell.
- (UICollectionViewCell *)collectionView:(UICollectionView *)collectionView
                  cellForItemAtIndexPath:(NSIndexPath *)indexPath
{
    BHAlbumPhotoCell *photoCell =
        [collectionView dequeueReusableCellWithReuseIdentifier:PhotoCellIdentifier
                                                  forIndexPath:indexPath];

    BHAlbum *album = self.albums[indexPath.section];
    BHPhoto *photo = album.photos[indexPath.item];

    photoCell.imageView.image = [photo image];

    return photoCell;
}
Here we grab the album for this section and then the photo for this item. Once we have that we can set the photo's image on the cell.
Fire up your app and see what you get… After the photos have finished loading, they should be visible in the collection view.
Optimizing Loading
Speaking of loading, did you notice how long it took to see those photos? We've essentially ground our apps responsiveness to a halt, as we're now making our users wait for all the visible photos to load before they can see or interact with anything. This ain't gonna cut it. Let's refactor our view controller so that photos are loaded in the background rather than on the main queue.
There are a few different approaches we could take here, but I've chosen to use a block-based NSOperationQueue, which let's us set priorities for the operations we perform.
@interface BHCollectionViewController ()

@property (nonatomic, strong) NSMutableArray *albums;
@property (nonatomic, weak) IBOutlet BHPhotoAlbumLayout *photoAlbumLayout;
@property (nonatomic, strong) NSOperationQueue *thumbnailQueue;

@end
Now let's initialize the NSOperationQueue and set it on our property. Since our operations are completely independent of each other, we'll also set the max number of concurrent operations it can perform at 3 which will make things load even faster.
self.thumbnailQueue = [[NSOperationQueue alloc] init];
self.thumbnailQueue.maxConcurrentOperationCount = 3;
Next, where we previously were loading the photo image directly each time we loaded a cell, we'll now put the operation queue to use so that it loads in the background.
- (UICollectionViewCell *)collectionView:(UICollectionView *)collectionView
                  cellForItemAtIndexPath:(NSIndexPath *)indexPath
{
    BHAlbumPhotoCell *photoCell =
        [collectionView dequeueReusableCellWithReuseIdentifier:PhotoCellIdentifier
                                                  forIndexPath:indexPath];

    BHAlbum *album = self.albums[indexPath.section];
    BHPhoto *photo = album.photos[indexPath.item];

    // load photo images in the background
    __weak BHCollectionViewController *weakSelf = self;
    NSBlockOperation *operation = [NSBlockOperation blockOperationWithBlock:^{
        UIImage *image = [photo image];

        dispatch_async(dispatch_get_main_queue(), ^{
            // then set them via the main queue if the cell is still visible.
            if ([weakSelf.collectionView.indexPathsForVisibleItems containsObject:indexPath]) {
                BHAlbumPhotoCell *cell =
                    (BHAlbumPhotoCell *)[weakSelf.collectionView cellForItemAtIndexPath:indexPath];
                cell.imageView.image = image;
            }
        });
    }];

    [self.thumbnailQueue addOperation:operation];

    return photoCell;
}
Don't be intimidated by all the concurrency, operations, dispatching and whatnot going on here… well, maybe a little intimidated, but only because it can be tricky for advanced programmers too. All we're doing is creating an NSBlockOperation with a code block that will be executed later on by the NSOperationQueue. Because we're referencing "self" inside the block, we also need to create a weak reference of it to use. This whole setup will allow our UI to remain responsive for our users.
When the block executes, it first loads the photo image as we did previously. Then via Grand Central Dispatch we asynchronously dispatch some work back to the main queue to set the image on our photo cell. This is necessary because anything that touches the UI needs to be run on the main queue. For performance reasons we're only going to set the image if the cell we're working with is still in view, that way if the user is scrolling really fast, we won't slow them down by setting images they won't even see! One last detail is that because the image may finish loading a while after the original call to cellForItemAtIndexPath: we shouldn't rely on the photoCell that was dequeued to be the actual cell for our index path anymore. It may have been reused already if the user continued scrolling. Instead, we re-obtain the cell based on the index path and then set the image on the cell's image view. (A side note, if our app allowed users to add, remove or rearrange photos, we wouldn't even be able to assume that the original index path is still valid, instead we would also need to look that up again based on the specific album and photo.)
With the NSBlockOperation created we'll now add the operation to our queue, which will handle the execution of the block for us. Let's give this a run and see how it performs.
The images should be loading noticeably faster now that 3 are loading at the same time and scrolling should be silky smooth. Nice work!
View Transforms & zIndex Ordering
Now that we have one photo loading for each album, let's up the ante and get a whole stack of photos loading and looking sharp. In order to do this we're going to take advantage of some other properties on UICollectionViewLayoutAttributes. In addition to setting the frame, we can also set values for transform3D, alpha, zIndex, hidden. If those aren't enough you can create a subclass and add custom properties as well, although I won't be covering that here. To achieve the stacking look we're going for we'll be using transform3D, and zIndex.
Conceptually what we want to have are photos stacked from top to bottom in each section with each photo having a slight rotation applied. This combined with the layer shadow we've already added to the cell is all that's necessary to make it look nice. First we'll handle the rotation…
We want the rotations on each photo to look kind of haphazard and natural, as if someone just dropped them on a table. We'll generate some random rotations to achieve this, but the only catch is that we need these rotations to stay consistent once we're generated them so that we can reload cells without having them change unexpectedly. To do this we'll generate a set number of rotations when we first create our layout and then we'll stick to using them in a predictable fashion through the use of a constant.
static NSUInteger const RotationCount = 32;
static NSUInteger const RotationStride = 3;
@interface BHPhotoAlbumLayout ()

@property (nonatomic, strong) NSDictionary *layoutInfo;
@property (nonatomic, strong) NSArray *rotations;

@end
We're going to load up this array with some CATransform3D rotations, but we need to import the QuartzCore framework into our project first for this to work.
// create rotations at load so that they are consistent during prepareLayout
NSMutableArray *rotations = [NSMutableArray arrayWithCapacity:RotationCount];

CGFloat percentage = 0.0f;
for (NSInteger i = 0; i < RotationCount; i++) {
    // ensure that each angle is different enough to be seen
    CGFloat newPercentage = 0.0f;
    do {
        newPercentage = ((CGFloat)(arc4random() % 220) - 110) * 0.0001f;
    } while (fabsf(percentage - newPercentage) < 0.006);
    percentage = newPercentage;

    CGFloat angle = 2 * M_PI * (1.0f + percentage);
    CATransform3D transform = CATransform3DMakeRotation(angle, 0.0f, 0.0f, 1.0f);

    [rotations addObject:[NSValue valueWithCATransform3D:transform]];
}

self.rotations = rotations;
First we create a temporary mutable array that we add objects to. Then we run through our loop, creating a rotation each time. We create a random percentage between -1.1% and 1.1% and then use that to create a tweaked CATransform3D. I geeked out a bit and added some logic to ensure that the percentage of rotation we randomly generate is a least 0.6% different than the one generated beforehand. This ensures that photos in a stack don't have the misfortune of all being rotated the same way. Once we have our transform, we add it to the temporary array by wrapping it in an NSValue and then rinse and repeat. After all 32 rotations are added we set our private array property. Now we just need to put it to use.
I've opted to set the transform on our UICollectionViewLayoutAttributes similarly to how we set it's frame, through the use of a private helper method.
- (CATransform3D)transformForAlbumPhotoAtIndex:(NSIndexPath *)indexPath
{

    NSInteger offset = (indexPath.section * RotationStride + indexPath.item);
    return [self.rotations[offset % RotationCount] CATransform3DValue];
}
We're making use of the stride constant we declared earlier to jump a few rotation values between sections. This allows us to get our money's worth from the rotations array, by offsetting in from the first rotation in the array based on the section and item of the passed in index path. We then mod this offset by the RotationCount to ensure we stay within the array's bounds. Because we've smartly chosen a stride of 3 and a total rotation count of 32 you'll notice that if we end up having lots of sections, we'll effectively use every rotation in the array as a starting offset, optimally disguising the fact that we use repeated rotation values. Now we just need to set them on our layout attributes.
for (NSInteger item = 0; item < itemCount; item++) {
    indexPath = [NSIndexPath indexPathForItem:item inSection:section];

    UICollectionViewLayoutAttributes *itemAttributes =
    [UICollectionViewLayoutAttributes layoutAttributesForCellWithIndexPath:indexPath];

    itemAttributes.frame = [self frameForAlbumPhotoAtIndexPath:indexPath];
    itemAttributes.transform3D = [self transformForAlbumPhotoAtIndex:indexPath];

    cellLayoutInfo[indexPath] = itemAttributes;
}
Let's give this a whirl and see what we get.
Alright, we've got a variety of rotations being applied to our photos, however you may have noticed that the frame edges look a bit jaggy. This can be fixed by asking our cell's layer to rasterize.
...
self.layer.shadowOpacity = 0.5f;
// make sure we rasterize nicely for retina
self.layer.rasterizationScale = [UIScreen mainScreen].scale;
self.layer.shouldRasterize = YES;

self.imageView = [[UIImageView alloc] initWithFrame:self.bounds];
...
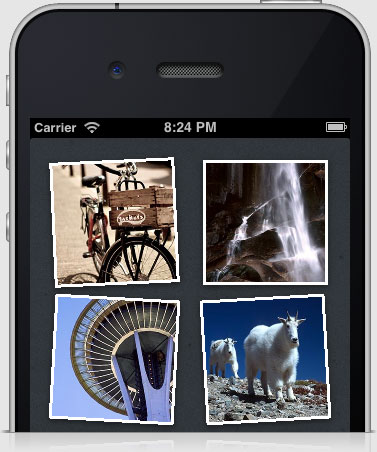
Now we should be seeing some smoothly rotated photos in our view. Heck, now that we've got our photos rotating nicely, let's punch up the number in each section to see some sweet, sweet stacking action!
NSUInteger photoCount = arc4random()%4 + 2;
for (NSInteger p = 0; p < photoCount; p++) {
    // there are up to 25 photos available to load from the code repository
    NSString *photoFilename = [NSString stringWithFormat:@"thumbnail%d.jpg",photoIndex % 25];
    ...
After increasing the number of photos, did you notice any difference in the loading time for the images? It's true, we do have more images to load, but we also care more about the top photo in each stack than the ones below it. How about we get that one to load ahead of the others?
One of the reasons I chose an NSOperationQueue as my means to load the photos asynchronously is because we can specify a priority level for each operation we create. Using this we can just elevate the priority of loading the top photo in each section.
...
operation.queuePriority = (indexPath.item == 0) ?
    NSOperationQueuePriorityHigh : NSOperationQueuePriorityNormal;

[self.thumbnailQueue addOperation:operation];

return photoCell;
...
For the top item we set the priority to high, the others we set to normal.
Let's runs the app again and see if this improved our load time.
Hmm, it doesn't seem to be making much of a difference. Perhaps the priority of loading isn't the only issue we're confronting…
In fact, changing the priorities of our operation tasks is only half the battle. We also need to ensure that what we consider to be the top photo is actually placed at the top of our view. To do that we need to specify the zIndex of our cells correctly. The zIndex dictates whether one cell is above or below another cell. By default all of our cells have a zIndex of 0, which means their order is completely arbitrary. Since we may have a variable amount of cells in each section let's use a base value for our zIndex and then increase it based on how high up in the stack the cell should land, with the top item being highest.
static NSUInteger const PhotoCellBaseZIndex = 100;
...
itemAttributes.frame = [self frameForAlbumPhotoAtIndexPath:indexPath];
itemAttributes.transform3D = [self transformForAlbumPhotoAtIndex:indexPath];
itemAttributes.zIndex = PhotoCellBaseZIndex + itemCount - item;
...
Now run your app to confirm that we're back to loading photos swiftly.
Alright! we're making progress, only a couple more things to work on before we have a fully designed photo album browser!
Supplemental Views
All these great photos sure are easy on the eyes, but this design also calls for the album name to be shown below each photo stack. To facilitate adding this title to our collection view, we're going to introduce another view type into the mix. Collection views can contain up to three types of reusable view subclasses in their layout: Cells (which we used for our photo stacks), Supplementary views, and Decoration views. If your view requires any kind of data from the view controller to display, then you need to use either Cells or Supplementary views. Decoration views on the other hand are mainly for aesthetic purposes and should not use any data from the view controller. Since our title views will display the name of each album, we need to use Supplementary views for these.
Most of the work we'll be doing will be very similar to the setup we did for our cells. Let's start out by modifying our layout to create space for the album titles. To do this we need to add some more vertical space between the bottom of one stack and the start of the one below it. Instead of making the height fixed and inflexible, let's add a property allowing consumers of our layout class to set the height themselves.
@interface BHPhotoAlbumLayout : UICollectionViewLayout

@property (nonatomic) UIEdgeInsets itemInsets;
@property (nonatomic) CGSize itemSize;
@property (nonatomic) CGFloat interItemSpacingY;
@property (nonatomic) NSInteger numberOfColumns;
@property (nonatomic) CGFloat titleHeight;

@end
Once again, we'll need to invalidate our layout should this property change, so let's explicitly implement the setter for the title height:
- (void)setTitleHeight:(CGFloat)titleHeight
{
    if (_titleHeight == titleHeight) return;

    _titleHeight = titleHeight;

    [self invalidateLayout];
}
- (void)setup
{
  self.itemInsets = UIEdgeInsetsMake(22.0f, 22.0f, 13.0f, 22.0f);
  self.itemSize = CGSizeMake(125.0f, 125.0f);
  self.interItemSpacingY = 12.0f;
  self.numberOfColumns = 2;
  self.titleHeight = 26.0f;
  ...
We're also going to need another unique kind string for the title view we're about to add. Since Supplementary and Decoration views need a kind string for registration lets make this string public so that we can use it for registration as well as in the layout dictionary.
#import <UIKit/UIKit.h>

UIKIT_EXTERN NSString * const BHPhotoAlbumLayoutAlbumTitleKind;

@interface BHPhotoAlbumLayout : UICollectionViewLayout
...
#import "BHPhotoAlbumLayout.h"

static NSUInteger const RotationCount = 32;
static NSUInteger const RotationStride = 3;
static NSUInteger const PhotoCellBaseZIndex = 100;

static NSString * const BHPhotoAlbumLayoutPhotoCellKind = @"PhotoCell";
NSString * const BHPhotoAlbumLayoutAlbumTitleKind = @"AlbumTitle";

@interface BHPhotoAlbumLayout ()
...
Splitting up the definition and setting ensures that consumers use the constant, not the specific value.
Next we need to create layout attributes for each title view within prepareLayout. This will require adding another sub-dictionary so that we can store our title's layout attributes in the same way we did for our cells.
NSMutableDictionary *newLayoutInfo = [NSMutableDictionary dictionary];
NSMutableDictionary *cellLayoutInfo = [NSMutableDictionary dictionary];
NSMutableDictionary *titleLayoutInfo = [NSMutableDictionary dictionary];
Now, since we only need one title per section, let's add it at the same time we're adding attributes for the first cell, conveniently using the index path we already have on hand.
for (NSInteger item = 0; item < itemCount; item++) {
    indexPath = [NSIndexPath indexPathForItem:item inSection:section];

    UICollectionViewLayoutAttributes *itemAttributes =
        [UICollectionViewLayoutAttributes layoutAttributesForCellWithIndexPath:indexPath];
    itemAttributes.frame = [self frameForAlbumPhotoAtIndexPath:indexPath];
    itemAttributes.transform3D = [self transformForAlbumPhotoAtIndex:indexPath];
    itemAttributes.zIndex = PhotoCellBaseZIndex + itemCount - item;

    cellLayoutInfo[indexPath] = itemAttributes;

    if (indexPath.item == 0) {
        UICollectionViewLayoutAttributes *titleAttributes = [UICollectionViewLayoutAttributes
            layoutAttributesForSupplementaryViewOfKind:BHPhotoAlbumLayoutAlbumTitleKind
                                         withIndexPath:indexPath];
        titleAttributes.frame = [self frameForAlbumTitleAtIndexPath:indexPath];

        titleLayoutInfo[indexPath] = titleAttributes;
    }
}
Notice that we need to supply the kind when creating the layout attributes for Supplementary views. This can be used to differentiate Supplementary views used in your layout that happen to use the same class, but require different layout attributes. (Imagine if we also wanted to have a smaller subtitle below the album name telling users how many photos are in the album. We could use the same view class, but we might want to use a decreased height) For our view we only have one type of supplementary view.
Finally, we need to set the titleLayoutInfo sub-dictionary on the top level dictionary:
newLayoutInfo[BHPhotoAlbumLayoutAlbumTitleKind] = titleLayoutInfo;
Since we're once again calling a private helper method to obtain the frame for our title, we need to go implement that as well.
- (CGRect)frameForAlbumTitleAtIndexPath:(NSIndexPath *)indexPath
{
    CGRect frame = [self frameForAlbumPhotoAtIndexPath:indexPath];
    frame.origin.y += frame.size.height;
    frame.size.height = self.titleHeight;

    return frame;
}
Calculating the frame for our title is a bit simpler since we can just base it off the frame of our cells. We do however need to update our cell frame and total content size calculations to take account for the added height of the titles.
- (CGRect)frameForAlbumPhotoAtIndexPath:(NSIndexPath *)indexPath
{
    NSInteger row = indexPath.section / self.numberOfColumns;
    NSInteger column = indexPath.section % self.numberOfColumns;

    CGFloat spacingX = self.collectionView.bounds.size.width -
                          self.itemInsets.left -
                          self.itemInsets.right -
                          (self.numberOfColumns * self.itemSize.width);

    if (self.numberOfColumns > 1) spacingX = spacingX / (self.numberOfColumns - 1);

    CGFloat originX = floorf(self.itemInsets.left + (self.itemSize.width + spacingX) * column);

    CGFloat originY = floor(self.itemInsets.top +
                      (self.itemSize.height + self.titleHeight + self.interItemSpacingY) * row);

    return CGRectMake(originX, originY, self.itemSize.width, self.itemSize.height);
}
- (CGSize)collectionViewContentSize
{
    NSInteger rowCount = [self.collectionView numberOfSections] / self.numberOfColumns;
    // make sure we count another row if one is only partially filled
    if ([self.collectionView numberOfSections] % self.numberOfColumns) rowCount++;

    CGFloat height = self.itemInsets.top +
                     rowCount * self.itemSize.height + (rowCount - 1) * self.interItemSpacingY +
                     rowCount * self.titleHeight +
                     self.itemInsets.bottom;

    return CGSizeMake(self.collectionView.bounds.size.width, height);
}
The last thing we need to do is override the method which obtains layout attributes for a supplementary view at a specific index path.
- (UICollectionViewLayoutAttributes *)layoutAttributesForSupplementaryViewOfKind:(NSString *)kind
                                      atIndexPath:(NSIndexPath *)indexPath
{
    return self.layoutInfo[BHPhotoAlbumLayoutAlbumTitleKind][indexPath];
}
That's all we need to update on our layout to handle album titles. Because of how we've structured our layoutInfo cache, no changes are necessary for layoutAttributesForElementsInRect: to correctly handle this additional view. If you run the app now, you'll see that extra height has been added between each stack.
Next we need to create a class for our album title views. Before we had subclassed UICollectionViewCell, but that class is used only for cells of a collection view. For supplementary views we need to subclass UICollectionReusableView.
This title view will be pretty basic, we'll just add one label, giving us a place to set our album name.
@interface BHAlbumTitleReusableView : UICollectionReusableView

@property (nonatomic, strong, readonly) UILabel *titleLabel;

@end
#import "BHAlbumTitleReusableView.h"

@interface BHAlbumTitleReusableView ()

@property (nonatomic, strong, readwrite) UILabel *titleLabel;

@end

@implementation BHAlbumTitleReusableView
...
Now we'll setup our label on the view. Unlike cells where we need to add subviews to the contentView, here we add them directly on the view.
- (id)initWithFrame:(CGRect)frame
{
    self = [super initWithFrame:frame];
    if (self) {
        self.titleLabel = [[UILabel alloc] initWithFrame:self.bounds];
        self.titleLabel.autoresizingMask = UIViewAutoresizingFlexibleWidth |
                                           UIViewAutoresizingFlexibleHeight;
        self.titleLabel.backgroundColor = [UIColor clearColor];
        self.titleLabel.textAlignment = NSTextAlignmentCenter;
        self.titleLabel.font = [UIFont boldSystemFontOfSize:13.0f];
        self.titleLabel.textColor = [UIColor colorWithWhite:1.0f alpha:1.0f];
        self.titleLabel.shadowColor = [UIColor colorWithWhite:0.0f alpha:0.3f];
        self.titleLabel.shadowOffset = CGSizeMake(0.0f, 1.0f);

        [self addSubview:self.titleLabel];
    }
    return self;
}
We also need to be sure to reset the label's text whenever the view is reused.
- (void)prepareForReuse
{
    [super prepareForReuse];

    self.titleLabel.text = nil;
}
Alright we've got some titles, before we can use them we need to define a reuse identifier and register them with the collection view.
static NSString * const AlbumTitleIdentifier = @"AlbumTitle";
#import "BHAlbumTitleReusableView.h"
[self.collectionView registerClass:[BHAlbumTitleReusableView class]
        forSupplementaryViewOfKind:BHPhotoAlbumLayoutAlbumTitleKind
               withReuseIdentifier:AlbumTitleIdentifier];
Now we'll implement another data source method and return instances of BHAlbumTitleReusableView when the collection view asks for them.
- (UICollectionReusableView *)collectionView:(UICollectionView *)collectionView
           viewForSupplementaryElementOfKind:(NSString *)kind
                                 atIndexPath:(NSIndexPath *)indexPath;
{
    BHAlbumTitleReusableView *titleView =
        [collectionView dequeueReusableSupplementaryViewOfKind:kind
                                           withReuseIdentifier:AlbumTitleIdentifier
                                                  forIndexPath:indexPath];

    BHAlbum *album = self.albums[indexPath.section];

    titleView.titleLabel.text = album.name;

    return titleView;
}
Theres nothing special going on here, we get the album for this section and set its name on our title view's label.
Alright, now let's see how our app is looking…
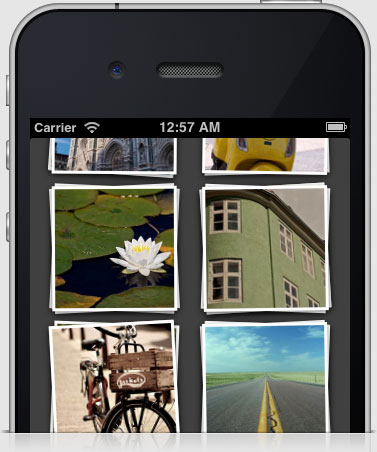
BOOM! We've got title labels, this thing is really starting to come together.
Now that everything is laid out nicely, lets make the view a little more visually interesting by swapping out the dull gray background color for a nice subtle textured look. A great website for finding textures which aren't visually overbearing is subtlepatterns.com. They have dozens of textures in both normal and retina sizes. I found this concrete wall texture to work great.
We can easily add a background texture to our collection view by creating a UIColor with a pattern image.
- (void)viewDidLoad
{
    [super viewDidLoad];

    UIImage *patternImage = [UIImage imageNamed:@"concrete_wall"];
    self.collectionView.backgroundColor = [UIColor colorWithPatternImage:patternImage];

    self.albums = [NSMutableArray array];
    ...
Decoration Views
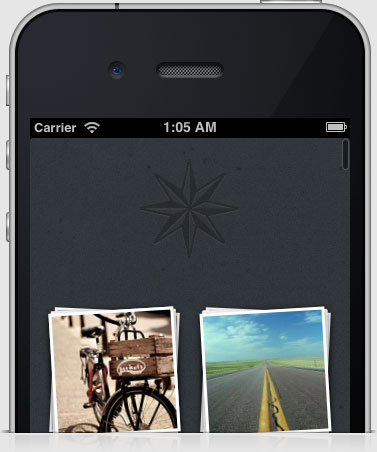
At this point I think we've got a pretty good looking view, but I'd also like to walk through how to add decoration views. Although this may be bit contrived, what we're going to do now is add a small emblem decoration tucked up above the photo stacks. It's something you'll only see when pulling down on the view before it snaps back into place, but it's a good way to show how to work these kinds of views in because they may be more beneficial in other layout designs.
Now that we've added cells and supplementary views, this will feel somewhat familiar. The primary difference is that our collection view's data source won't need to be involved with the logic of the emblem view. The layout and the emblem view itself will handle everything on their own.
For this view, we're just going to display the same image all the time and this can easily be done within initWithFrame: on our emblem view. If you wanted to create a more customizable decoration view, you would need to make use of custom properties, which requires creating a subclass of UICollectionViewLayoutAttributes and then setting those up within the layout. You can use the image I used or use your own.


We're also going to create a simple class method to return the size of the image so that we can provide this to our layout class without needing to instantiate an emblem view.
 @interface BHEmblemView : UICollectionReusableView

 + (CGSize)defaultSize;

 @end
static NSString * const BHEmblemViewImageName = @"emblem";
@implementation BHEmblemView

+ (CGSize)defaultSize
{
    return [UIImage imageNamed:BHEmblemViewImageName].size;
}
...
Now we'll set up the view to display our emblem.
- (id)initWithFrame:(CGRect)frame
{
    self = [super initWithFrame:frame];
    if (self) {
        UIImage *image = [UIImage imageNamed:BHEmblemViewImageName];
        UIImageView *imageView = [[UIImageView alloc] initWithImage:image];
        imageView.frame = self.bounds;

        [self addSubview:imageView];
    }
    return self;
}
The collection view will handle instantiation of the emblem view using the frame which we'll set on it's layout attributes.
Unlike cells and supplementary views, decoration views are registered with the layout rather than the collection view.
#import "BHEmblemView.h"
static NSString * const BHPhotoAlbumLayoutPhotoCellKind = @"PhotoCell";
NSString * const BHPhotoAlbumLayoutAlbumTitleKind = @"AlbumTitle";
static NSString * const BHPhotoEmblemKind  = @"Emblem";
[self registerClass:[BHEmblemView class] forDecorationViewOfKind:BHPhotoEmblemKind];
Unlike the other views we've added, only the layout class deals with decoration views, thus we perform the registration here rather than in the view controller.
Now lets create another private frame helper method for our emblem.
- (CGRect)frameForEmblem
{
    CGSize size = [BHEmblemView defaultSize];

    CGFloat originX = floorf((self.collectionView.bounds.size.width - size.width) * 0.5f);
    CGFloat originY = -size.height - 30.0f;

    return CGRectMake(originX, originY, size.width, size.height);
}
Here we get the default size for our emblem and then calculate an origin that will place the view centered horizontally and ending 30pts above the very top of the collection view and pass it back.
Now that we have our frame, we're ready to create some layout attributes for the emblem. Since we're only going to have one emblem, we can create our attributes before we loop through all the sections and rows. Once again, we'll create a sub-dictionary and add it to the layoutInfo dictionary.
- (void)prepareLayout
{
    NSMutableDictionary *newLayoutInfo = [NSMutableDictionary dictionary];
    NSMutableDictionary *cellLayoutInfo = [NSMutableDictionary dictionary];
    NSMutableDictionary *titleLayoutInfo = [NSMutableDictionary dictionary];

    NSInteger sectionCount = [self.collectionView numberOfSections];
    NSIndexPath *indexPath = [NSIndexPath indexPathForItem:0 inSection:0];

    UICollectionViewLayoutAttributes *emblemAttributes =
        [UICollectionViewLayoutAttributes layoutAttributesForDecorationViewOfKind:BHPhotoEmblemKind
                                                                    withIndexPath:indexPath];
    emblemAttributes.frame = [self frameForEmblem];

    newLayoutInfo[BHPhotoEmblemKind] = @{indexPath: emblemAttributes};

    for (NSInteger section = 0; section < sectionCount; section++) {
    ...
The last step is to return layout attributes for a decoration view with a given kind at a given index path.
- (UICollectionViewLayoutAttributes *)layoutAttributesForDecorationViewOfKind:
    (NSString*)decorationViewKind atIndexPath:(NSIndexPath *)indexPath
{
    return self.layoutInfo[BHPhotoEmblemKind][indexPath];
}
That's all we need to do for the emblem. If you fire up the app and pull down on the view, you should see the emblem tucked above.
This covers the fundamental steps of creating custom layouts with UICollectionView. I hope it's been enlightening! From this point you could consider implementing custom animations for adding, deleting or moving items. Maybe it would be cool to tap a stack and have it expand out into a more detailed view for that album. If theres a lot of interest I may consider covering more advanced topics in an additional tutorial.
Although I don't have a comments section here, feel free to email me any feedback regarding this tutorial at bryanehansen@gmail.com.